
🧐 How to enable IPv6 on your Atomic fibre internet
The IPv6 protocol is the default and quickest way to start up a new internet connection in most modern operating systems. IPv4 space is mostly exhausted. Despite not technically needing to use IPv6, if you want to enjoy the benefits and future-proof your network you are welcome to do so.
🤓 Why use IPv6?
Because IPv4 space is expensive and running out in the near future, many ISPs have stated using CGNAT (Carrier-Grade Network Address Translation), not giving customers their own public IP (unless they pay extra for a static IP). With IPv6 there is lots of IP space, so each customer can get a (massive) number of public IPs.
Atomic does not do any CGNAT.
NB. Remember to check that your router has firewall rules to protect the devices on your LAN if they get public IPv6 addresses. With IPv4 the devices on your LAN will usually be protected by NAT on your router.
⚠️ Before we start
Your router needs to support IPv6, and the underlying Fibre Network Operator you are connected to needs to support IPv6. Below is the IPv6 compatibility across Fibre Networks:
- ✅ Octotel 🐙
- ✅ Frogfoot 🐸
- ✅ Openserve 🦎
- ✅ Vumatel GPON 🐰
- 👾 Vumatel Active Ethernet – No native support, but possible with a SIT tunnel or a Wireguard VPN
🐙 Octotel, 🐸 Frogfoot and 🐰 Vumatel GPON (Layer2)
We provide a /48 block of IPv6 address space to each customer router. You simply need to enable DHCPv6 on your router (steps are below).
If you would like a static /48, please order via our change request form.
Note: Since early 2024, we enabled dynamic v6 PD-Pools on all networks (other than Vumatel AE). Creating static leases involves setup and admin on our side. Our latest pricing policy: buy a v4 static IP, get a v6 static lease for free. Dynamic v4 and dynamic v6 public IPs do not have an extra cost.
🦎 Openserve (PPPoE)
For Openserve we provide IPv6 over a PPPoE session. A dynamic IPv6 address range is set up when your router connects.
🐰 Vumatel AE (Active Ethernet)
We can offer you IPv6 via a WireGuard VPN or SIT tunnel. Your router / firewall would need to support this:
https://www.wireguard.com/
https://wiki.linuxfoundation.org/networking/tunneling#sit-tunnels
The other option is just to use IPv6 from your laptop or phone via something like Cloudflare’s 1.1.1.1 / WARP service: https://1.1.1.1/
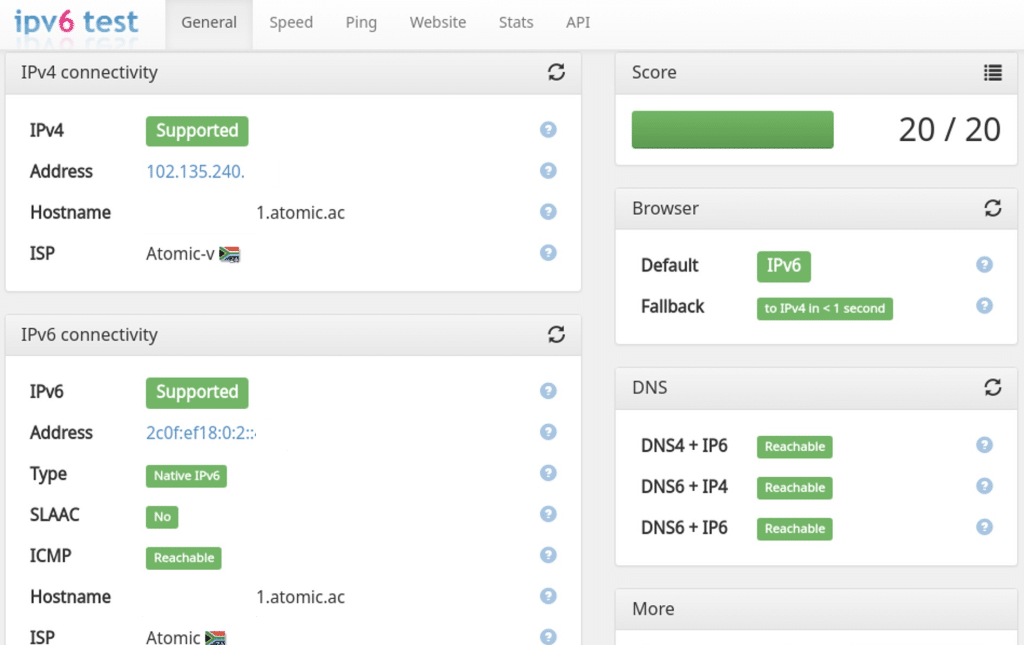
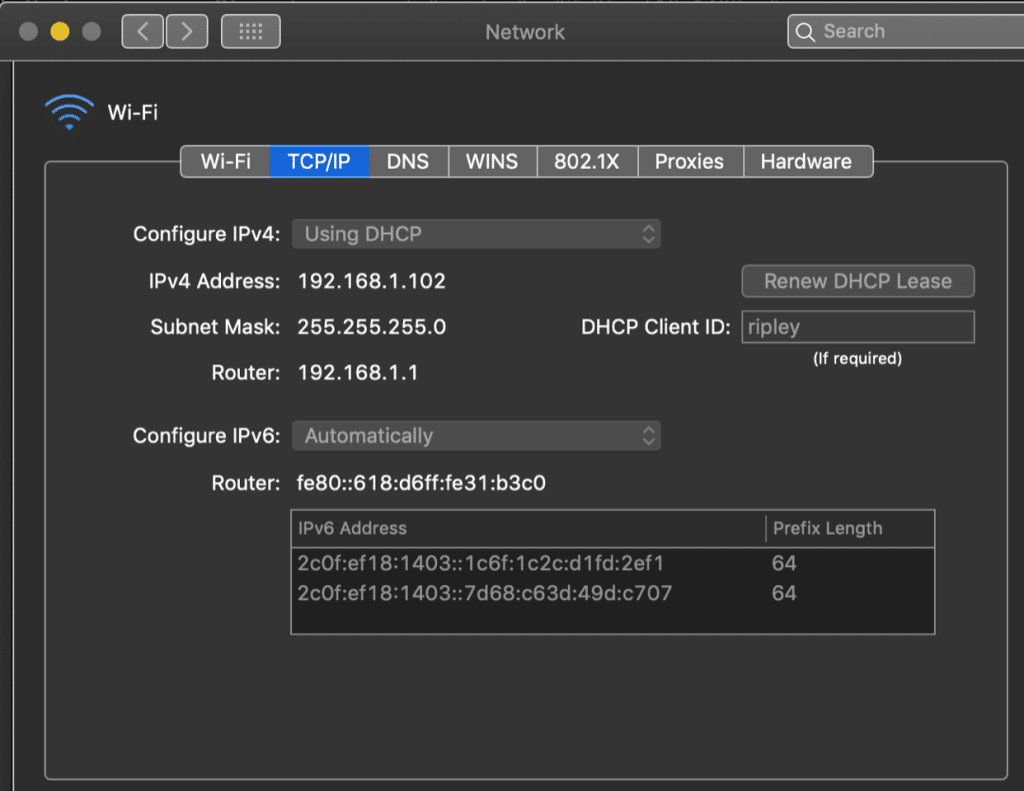
🕵️♂️ How to check IPv6 is working
As a first step, connect your laptop directly to the fibre box / ONT. You should get an IPv6 IP and the following should work:
IPv6 checker: http://ipv6-test.com/
If you use a Firefox or Chrome browser, here are add-ons which are useful:
- Chrome: IPvFoo
- Firefox: SixIndicator
Enabling IPv6 on your Router
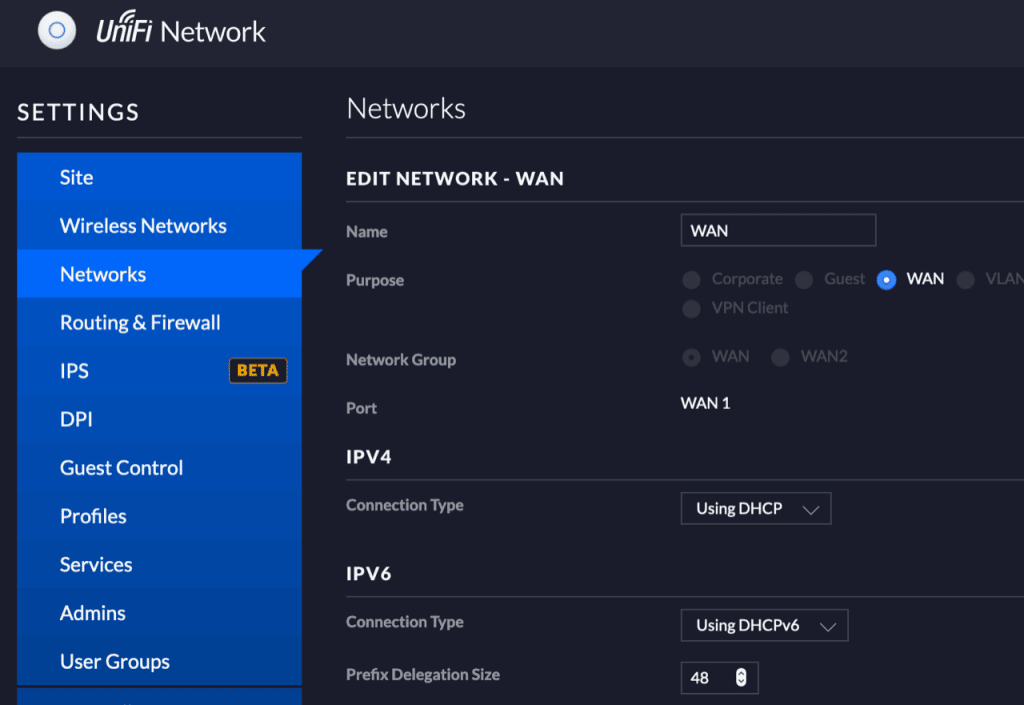
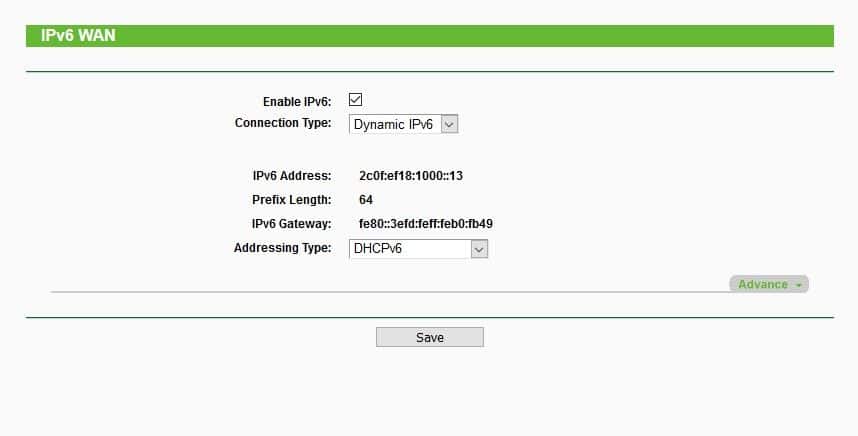
Configure your router’s WAN interface to ask for a DHCPv6 lease and a PD Pool of /48.
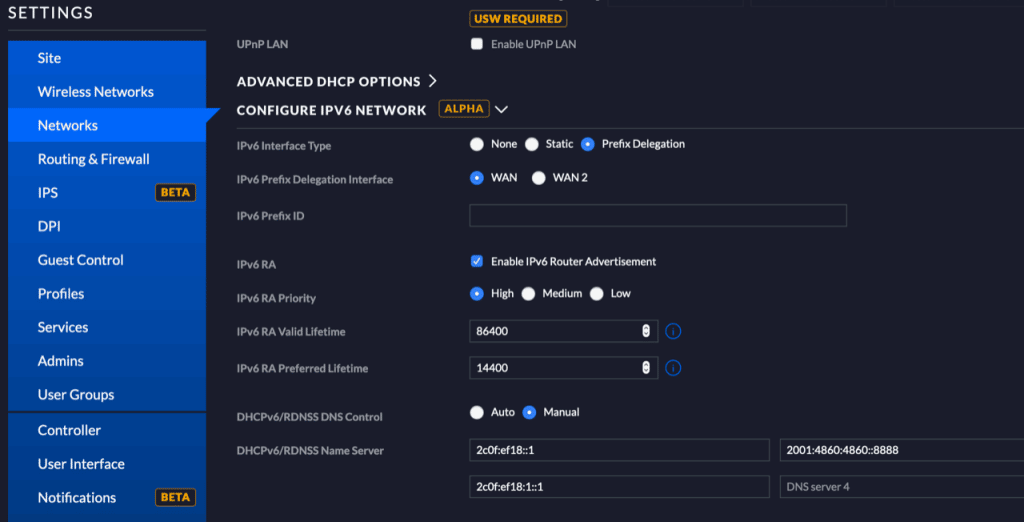
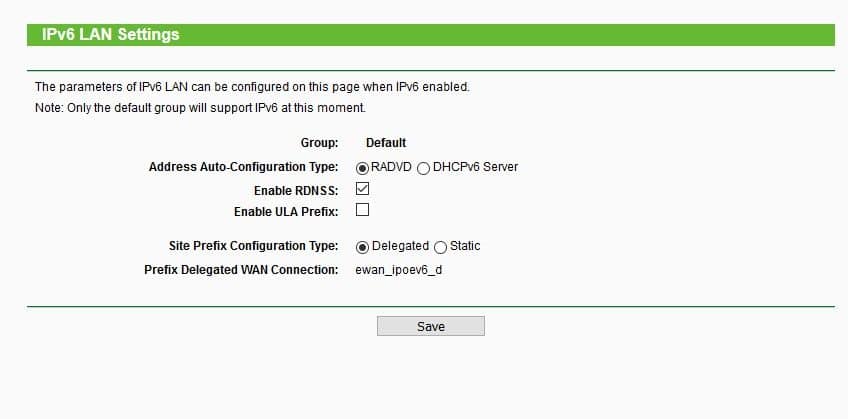
On the LAN side, enable IPv6 Router Advertisements / SLAAC.
Here is an example static lease config on our side:
{

"duid": "00:03:00:01:88:d7:f6:b7:cc:70",

"ip-addresses": [ "2c0f:ef18:1000::2" ],

"prefixes": [ "2c0f:ef18:1402::/48" ]

},
Details for several router brands are below.
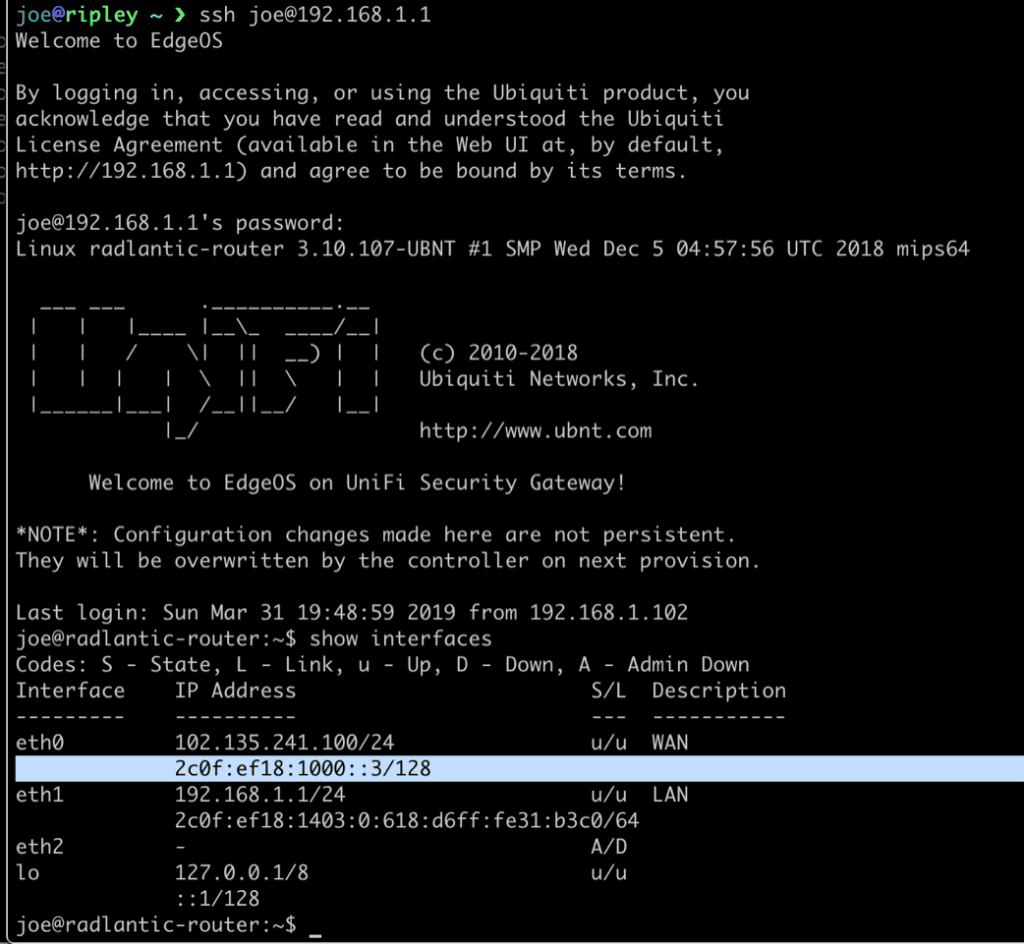
Router config: USG / Unifi
Router config: Mikrotik
/ipv6 address

add address=::/64 advertise=yes disabled=no eui-64=no from-pool=IPv6-delegated-pool interface=\

ether2-master no-dad=no

/ipv6 dhcp-client

add add-default-route=yes disabled=no interface=ether1 pool-name=IPv6-delegated-pool \

pool-prefix-length=64 prefix-hint=::/0 request=address,prefix use-peer-dns=yes

/ipv6 firewall filter

add action=accept chain=forward in-interface=ether1 protocol=icmpv6

add action=drop chain=forward connection-state=invalid,new in-interface=ether1

/ipv6 nd

set [ find default=yes ] advertise-dns=no advertise-mac-address=yes disabled=no hop-limit=\

unspecified interface=all managed-address-configuration=no mtu=unspecified other-configuration=\

no ra-delay=3s ra-interval=3m20s-10m ra-lifetime=30m reachable-time=unspecified \

retransmit-interval=unspecified

/ipv6 nd prefix default

set autonomous=yes preferred-lifetime=1w valid-lifetime=4w2d

/ipv6 settings

set accept-redirects=yes-if-forwarding-disabled accept-router-advertisements=\

yes-if-forwarding-disabled forward=yes max-neighbor-entries=8192
…
with some background…
The idea is to get a WAN address from the DHCP server, plus some network space for the LAN. Then we split up the LAN space and hand it out using SLAAC:
/ipv6 dhcp-client

add add-default-route=yes interface=ether1 pool-name=IPv6-delegated-pool request=address,prefix
My WAN interface is ether1. We access a DHCPv6 address on it as well as a pool for the LAN, putting into LAN address pool “IPv6-delegated pool”.
/ipv6 address

add from-pool=IPv6-delegated-pool interface=ether2-master
My LAN interface is ether2-master. I seem to remember having to do a bit more configuration to get the delegated /48 into /64’s but that should work for a start.
Router config: TP-Link

Asus IPv6 settings
Log into your router and go to: WAN → IP Version → IPv4 / IPv6
Set MTU as 1500 (standard).
There is more information here: https://www.asus.com/support/FAQ/113990/
Edgerouter
Router: Ubiquiti EdgeRouter X SFP 6-Port
Solution for EdgeMax in general: https://community.ui.com/questions/DHCPv6-PD-stop-dor-set-DUID/79aa052b-0933-434c-b2ef-3d0275a10eeb
Perl script needed a bit of tweaking: /opt/vyatta/sbin/dhcpv6-pd-duid.pl
function: set_duid
comment out these 2 lines:
# my $buf = pack("n", $len);

# print $FH $buf || die "duid length write failed: $!\n";
Add new:
my $buf;

my $endian = $Config{byteorder};

if ($endian == 1234 or $endian == 12345678) {

$buf = pack("v", $len);

}else{

$buf = pack("n", $len);

} print $FH $buf || die "duid length write failed: $!\n";
In configuration set static duid:
set interfaces ethernet eth0 dhcpv6-pd duid 0001000126a975547483c2484390