
![]()
Get your Vumatel Fibre line installed
We’ve put together this guide to make your Vumatel Fibre installation process as smooth as possible.
This guide includes a lot of information, with some important things for you to do, and think about. We feel that you should rather have too much info than too little at this point. Please make sure to read the points at the end if you’re in a TL;DR mood!
Routers and settings:
You can also use your own router and configure it yourself – just make sure it is set to DHCP/Dynamic IP. We have most router settings on this page of our website: https://www.atomicaccess.co.za/docs/router-settings/.
If you ordered a router from Atomic, we’ll configure it and arrange to deliver it to you via courier.
Power for hardware requirements:
- One is for the ONT/CPE device that Vumatel will install.
- The other is for your WiFi router.
- If you would like to power your Fibre during Loadshedding, please review our Fibre During Loadshedding Guide, and ask us for help for specific devices so you don’t buy the wrong UPS.
The Install – How it works:
In order to power the devices that are being installed, you need to have 2 x 2 prong adapters in close proximity of each other (these devices are hard-wired together with a network cable).
- The fibre installation is something the Fibre Network Operator (FNO), Vumatel, handles (not Atomic).
- While the FNO do many of the installs themselves, they also contract some of the work out to third-party contractors.
- Vumatel will sometimes send a PDF explaining the details about your installation.
- Your responsibilities
- Scheduling of the installation date – remember billing starts from the day after the line is activated.
- Placement of the Fibre ONT/CPE is important (ask us for help if you need assistance in choosing a good spot). Moving your ONT/CPE will incur a reinstallation fee.
- You will be responsible for moving any furniture, wall hangings or ornaments that may be in the way of their chosen cabling route.
- It’s worth noting that the teams coming into your home, are doing so for the first time, so it is your responsibility to point out hazards and areas you don’t want them to run fibre and also secure any valuable/fragile items.
- Depending on your installation difficulty, they will likely be drilling into/through walls, and this means you will need to advise if there are any water mains pipes, electric cables or other hazards where the drilling will take place.
- Where fibre can be easily damaged (for example, by pets), it must be placed in a conduit. Additional conduit required above the included length (outlined below) can be arranged and will be quoted by the installation team.
- An adult needs to be at home to instruct the installers and also sign for approval.
- What’s included in the standard Vumatel Fibre installation
- The installation team will communicate about any additional costs. The Vumatel team member or 3rd party contractor will quote you directly if any additional costs are required.
- Up to 75m of fibre cable from the connection point (Wallbox, MODB or joint) to the CPE/ONT.
- Up to 30m of white conduit including couplings and saddle clamps.
- Up to 30m of trenching at 150mm to 300mm depth in soft soil (excluding paving, tiles, and tar).
- Up to 5m of trenching at 150mm to 300mm depth of paving, grass, tar (excluding tiles). Should further trenching be required, it will be at an additional cost per m with the customer liable for reinstatement of the paving, tiles, tar.
- You will have up to 3 months from the installation date to log an installation quality complaint with Vumatel or through Atomic, should you find fault with the installation. If you have an installation problem and fail to notify Vumatel or Atomic within the 3-month warranty period, you will be liable for the cost of a re-installation.
- What’s not included
- 2 pin power adapter (and lead if required) for the CPE/ONT power source.
- Trunking.
- Painting.
- If you have existing conduits you would like to use they need to be in an excellent state of repair, with no gaps or holes and have a drawstring to pull the fibre cable through. If your conduit is damaged or does not have a drawstring, it cannot be used.
- NB: If you have any issues with the installation taking place, please raise this with the installation team during the installation (if possible) as they are most likely able to deal with your issues then (and to get them to come back in a timely manner can be a challenge).
Tips and tricks to make the installation go smoothly:
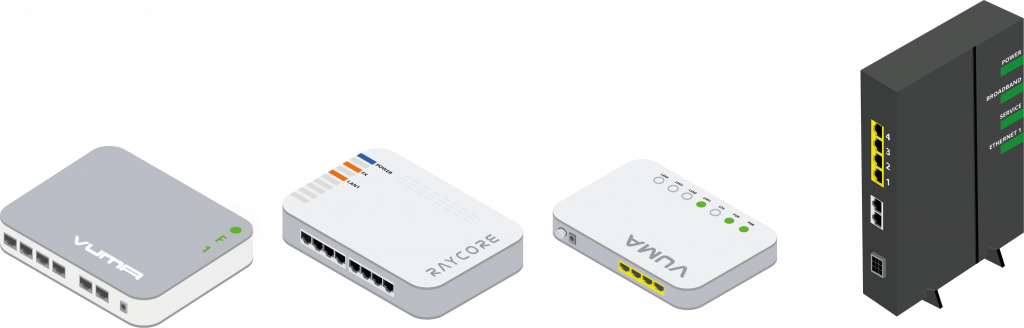
Vumatel use different Fibre ONT/CPEs, this is what they look like:
- The first thing you need to think about is where you’d like your router to eventually go (within reason). Bear in mind that both the devices your FNO install and your router need to be within range of a plug. The technicians can help advise on this if you are unsure, or call us for advice.
- Be clear about where you want cables to run and where you want boxes to be attached to your walls. Explain how you want things to look and if you want to hide any parts of the installation. Be explicit, the cables and boxes are not going to be moving after they have been installed.
- If you have a garden or you need the fibre cable to run outside the technicians will need to run trunking pipes for the Fibre to run through. When the technicians run the pipe please check it looks nice before they attach it to your property.
- Please note the install team is limited to using plastic trunking to cover the fibre line outside- lifting of paving and putting it back is not included. They are meant to be in and out in under 2 hours, so if you need special consideration for your installation this will need to be planned beforehand and is not part of a regular installation scope.
How long it takes to get onto the internet:
- You will probably not be online immediately after installation I’m afraid. This is because your line has to be “provisioned”. Your service could be quickly provisioned by Vumatel remotely, or it could require technicians to go to your nearest manhole cover to work on your line. Your technicians should be able to answer this during the installation.
- In most cases, Vumatel can make the line live the same day, or within a day or two. It can be as quick as a couple of hours but can take longer, so mentally prepare yourself.
Recap of key points:
- Please ensure you are at home during the installation. An adult needs to be at home to instruct the installers and also sign for approval. It’s a bad idea to leave written notes and to get your domestic helper to instruct the installers and approve the installation.
- You should be live the same day, or 1-2 working days after the installation but up to 5 working days, but in very rare occasions or pre-live installations, it might take a little longer.
- You will need two 2-prong plug points.
- The fibre equipment remains the property of Vumatel, damage or loss will result in replacement costs. Please leave the fibre boxes and power supply if you move.
- Billing starts once your service is live and you will get your invoice via email at the end of your first month. Any partial month will be billed pro-rata from the day after you are activated.
We hope this helps make your installation process smoother and you’re better able to get the most out of your installation. If you have more suggestions, tips or questions that might help other customers please let us know.